Showing posts with label new recipes. Show all posts

Saturday, March 22, 2014

The Adventurous Barista presents "Macchiato in the Making"

macchiato: italian for marked or stained


The true way to start off, is to brew a couple shots of espresso in a genuine espresso maker. Ya know, that fancy contraption that drips life juice? But we don't own one of those beauts, so I make do with a strong brew of espresso grind in our French press pot. 


If you happen to be the lucky duck with the espresso maker, go ahead and heat/steam your milk. (For a 12 oz. drink, use about a cup of milk) 


Prepare your mug or cup with a Tbs of the flavoring of your choice. (I use this vanilla flavoring, or if I want a healthier version, just a tsp or so of pure vanilla extract) 


If you are in the same position as me, and don't have a machine to do the work for you ;), just heat up some milk on the stove and whisk it until it's nice and frothy. 

works like so ;) 

Now it's time to start building your masterpiece. Go ahead and either pour or ladle your milk into the cup. You need to make sure that there's a good amount of foam in there, so if needed, just skim some extra in. 


Wait for a moment (about 30-60 seconds) until you can clearly see the milk settling into two layers: 


Beautiful, ain't it? 
Ok, now you want to measure out a shot of your hot espresso (don't let it cool any) 


Here's where the magic of the drink comes into play. But it's a very fragile beauty, and can only be done with a good deal of patience and steadiness. You are going to take a spoon and angle it so that the tip is pointing down towards the edge of the glass. SLOWLY pour your shot of espresso onto the back of the spoon, letting the coffee make a SLOW entrance into the foaminess. If performed correctly, you will begin to see a neat separation of the elements, as the coffee settles beneath the foam, but above the milk. I use at least 1 shot per drink....depending on the day, 2 may be more appropriate. ;) Like I said, the slow and smooth factor is VITAL to this layered drink. But I tell you, it is worth it.....


....when you behold the full glory of your creation! 


And the look don't take all the cake.----this has been a HUGE hit in our house, and I get custom orders from my mom and sisters every day. ;) You can do so many variations of this drink: caramel, hazelnut, mocha, almond, irish cream, etc. I didn't put a topping on this one, but feel free to use your creative juices, and sprinkle with cinnamon, garnish with chocolate shavings, or whatever your little barista heart desires. 
Ladies, and Gents. I give you the
MACCHIATO

You're very welcome,
Sarah

Wednesday, July 24, 2013

New Blog Series: Culinary Cabaret! :)

Okay guys! I am thrilled and excited to introduce to you to the new blog series starting here on Two's Company! This series will be called "Culinary Cabaret" after the line in Disney's "Be Our Guest" which runs: "Beef ragout, cheese souffle, pies and puddings en flambe! We'll prepare and serve with flair a culinary cabaret!" Essentially, this series is a challenge you all will be able to link up with any week you'd like! It will run for 52 weeks (hopefully 52 adjacent weeks...we'll see how that works out) which is a year. The idea is that each week I'll post a theme, and you will have a chance to make one new recipe (or a variation of an old one) that fits the theme. Themes could be as simple as "Indian", "Greek", "Italian" or as complex as "Pixar Movies", "Downton Abbey", "Autumn", or, hey, something as crazy as "Oxford don". Sarah and I will chose one new recipe a week and blog about it--and you'll do the same!


And for those of you who are sitting there looking at this post thinking, "Aw, gee, I don't think I can be that creative," all I'm saying is that it is one recipe a week. Not a whole meal. It won't be expensive because, hey, people in India don't always have a ton of money and if you've got some watermelon and some milk and ice you can make a melon lassi that would fit that theme and not cost a dime. And besides--a challenge isn't supposed to be terribly easy. It's meant to be doable though, and I thoroughly believe that one new recipe a week is doable. I will be posting the theme for the week on Mondays and you will have until the following Monday to link up with your post and recipe. Not only will Culinary Cabaret improve your own creativity, but we can serve as inspirations for each other! And remember, linking up once does not mean that you have to do all 52 weeks! I would love to see you anytime throughout the course of the challenge. So please spread the word, and if any of you are wizards with blog buttons, feel free to make and share a button about the challenge. I want to get as many people involved as possible. :)

Looking forward to breaking out my skillz,
                                                          Rachel

Monday, February 18, 2013

visiting casey :)


While you're enjoying your winter weather and cozy days, we are pleased to be visiting with Casey this afternoon. :) Check out my guest post here: http://caseyheard.blogspot.com/2013/02/buckeye-brownies-by-sarah-heffington.html Casey is a dear friend of our's and I was very excited when she invited me to post on Cattails! 

Thursday, May 17, 2012

the icecream sandwich.


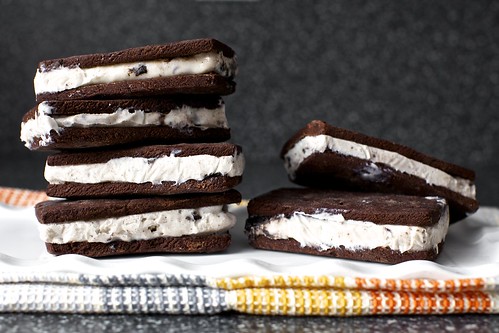
So yesterday Rachel found this amazing recipe for real homemade icecream sandwiches! We have loved browsing around Smitten Kitchen's recipe library, and when this particular recipe was found, it was decided then and there that we would have icecream sandwiches for dessert. :D But yesterday was also our baking day, so while Rachel was putting the finishing touches on the cinnamon rolls, I ended up making these babies. ;) I'll include the recipe below, since I can't write it in half as entertaining a way as Amy does:


Yield: 12 2-by-4-by-1-inch ice cream sandwiches (24 cookies). However, I made 10 large and 10 miniature (1-by-1.5-inch) sandwiches because while I was baking the large ones, my son toddled in from his nap and announced “Mommy making cookies! For Jacob!” and I realized he probably didn’t need a cookie nearly the size of his head. I am so very mean.
If you have a favorite cookie cutter shape you’d like to use for these sandwiches, definitely use it. You can cut the cookies and the ice cream with it. You could perhaps even make, say, star-shaped ice cream sandwiches for a 4th of July-themed cookout. You know, if you’re not me.
Re, the cocoa weight below: Just about everyone on earth besides me finds that a cup of unsweetened cocoa powder weighs 80 to 85 grams. That’s what the number below is based on. However, I consistently find that my super-fancy Valrhona Dutch cocoa weighs in a bit higher, up to 5 to 10 grams more than you see below. So, you might nudge it up if you’re using the same.

Cookies
2 2/3 cups (335 grams) all-purpose flour
2/3 cup plus 1/4 cup (75 grams) extra dark or Dutch-processed unsweetened cocoa powder
1 1/4 cups (2 1/2 sticks or 285 grams) unsalted butter, softened
1 cup (200 grams) granulated sugar
3/4 teaspoon table salt
2 large egg yolks
1 tablespoon vanilla extract

Filling
1/2 gallon (8 cups or approximately 1050 grams, weight will vary by brand/variety) ice cream, your choice of flavor (I used cookies and cream), softened
Preheat oven to 350°F degrees. Line two baking sheets with parchment paper. Sift the flour and cocoa together (I am generally too lazy to sift things but cocoa is really lumpy so don’t skip this) and set aside. In the bowl of a standing mixer with a paddle attachment, beat the butter, sugar, and salt together until light and fluffy. Add the yolks and vanilla and mix until combined, then scrape down sides and mix briefly again. Add the flour mixture a little at a time then mix until combined.
Transfer the dough to a lightly floured work surface and divide into two equal pieces. If the dough is too soft to handle, wrap and chill it until firm enough to roll out (I recommend 30 minutes only; any longer and it becomes crumbly to roll out). Roll each batch into a 1/4-inch thick rectangle, about 10 by 8 inches. Cut into a total of 24 2-by-4-inch rectangles.


Use an offset spatula to transfer the rectangles to the prepared sheets; you’ll only need an inch space between them. Use the tip of a thermometer (totally brilliant tip from Amy, by the way; it made far better indentations than skewers that I usually use for docking) to poke the cookies with holes (Amy recommends 14 holes but I used thisas my guide and made more).


Bake the cookies for 16 to 18 minutes, or until they stay firm when tapped in the center. Transfer to a wire rack to cool completely. Repeat with remaining cookie dough, rerolling scraps as needed.
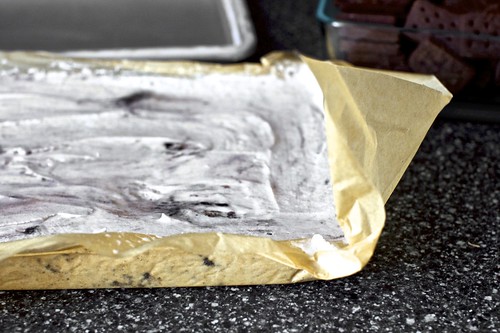
Meanwhile, line the bottom of a 9-by-13-inch pan with parchment paper, allowing it to overhang on two sides (it will act as a sling for the ice cream). Spread the softened ice cream into the pan, smooth the top and freeze until firm, about one hour (or longer if your freezer is as terrible as mine).


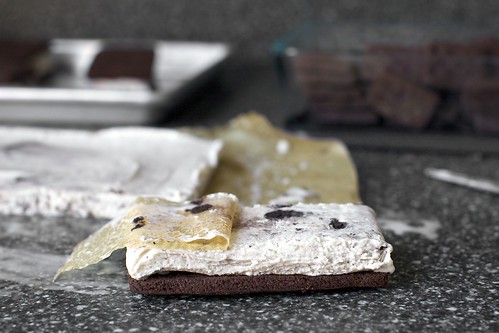
Run a knife along the exposed sides of the pan to loosen the ice cream. Holding onto the parchment paper, lift ice cream out of the pan and onto the work surface. Using one of the cookies as a template, cut ice cream into 12 2-by-4-inch bars. Strangely, I found using kitchen shears to go right through the ice cream and the paper underneath the easiest. I then flipped each piece of ice cream onto a cookie, peeled off the paper, and finished sandwiching the rectangle of ice cream with a second cookie.


(Look, I’d be lying if I didn’t tell you that this whole ice cream part caused a spectacular mess in my kitchen. Huge! It was an ice cream massacre! But, I was rushing and you should not. If your ice cream begins to soften, just slide it back into the freezer for a bit and it will become easy to work with again. Promise. Do as I say, not as I did, unless you like sticky floors.)
Wrap each ice cream sandwich in plastic and please, again, listen to Amy here. I was all “Oh, let me just get them cold again and I’ll wrap them later.” Which was wrong. They continue to lose their shape for a bit, runny and melting, before they freeze up and that is why my sandwiches were kind of a mess. “Sealing” them into their shape immediately with plastic is, well, the reason that Amy is a sweets stylist and my food looks, uh, “handmade.”
Freeze until just before serving.


{All photos courtesy of Smittenkitchen.com}

That's pretty much the process we went through, except I didn't catch on to the whole "freezing icecream in a tray" part. :P But they did turn out very well, and, I believe, were a hit in our family! (I am still without a camera, but took a couple pictures on Daniel's phone)

Some of the cooked cookies....(wait--that sounds redundant. :P)

hehe...this one was a bit messy, weren't it? 

But they were very tasty, all the same!!! :)
So, would you all like to see more recipe posts around here?? Leave a comment and let us know!

Monday, April 23, 2012

Ze Sourdough Challenge

I wanted to alert you girls to a new sort of Challenge! I'm reprinting (or re-typing--you choose) a post I did on my blog for Stay-at-home daughters: A Butcher, a Baker, a Candlestick-maker. It's called the Sourdough Challenge...

I am in a dreadfully perverse mood recently. I don't know what it was bred of but it makes me feel rather strongly like doing strangely unaccountable things like...adopting a pair of white ducks to do paintings of, (Me, who hasn't picked up her brush in a month or two entire!) or make cheese or (and this is the point on which this whole post is orbiting...)

Make Sourdough bread.


This has a logical path. We were given some free sourdough bread and it was made with white flour. I try to avoid white flour...I really do. But Sourdough is my one weakness. I broke under the pressure of Trying Not To. ;) I cut the slices very very thinly and toasted them, buttered them, and had myself some Secret-Toast with a hot cup of tea.

"Evangeline, may I have some secret-toast-and-jam?"
"Most certainly not."
"Alright--forget the jam--just some secret toast?"

(Forgive me for quoting Nanny McPhee in a moment like this. ;) I decided I had to remedy the situation. After all, must the White-Flour-Eaters have all the sourdough? No. Never. I flatly refused. So after imibibing in the Secret-toast and tea, I betook myself to the laptop and rummaged up a Sourdough Starter Recipe.


And this is where the challenge begins. I'm starting my starter tonight. (And making it whole wheat.) Will you girls begin a starter too? It "brews" for 5-10 days and at the end of the time if you don't feel like continuing with the sourdough, just toss it--it is rather a cheap experiment anyhow! :)

The recipe I found was from a fabulous little website I just tripped over called Chickens in the Road. I think it and me are going to be good friends by-and-by. (And no, it had nothing to do with the fact that I found a recipe for Apple-lilac jelly. No indeed.)

Here, my fellow Butchers, Bakers, and Candlestick-makers, are the Brewery Instructions:


Sourdough Starter(from www.chickensintheroad.com)
1 Tbs. yeast (not rapid-rise)
1/2 cup warm water
1 1/2 cups whole wheat flour
1 1/2 additional cups warm water
1 Tbs. honey or sugar
Mix the yeast with the 1/2 cup warm water in a non-metal container. Mix with other ingredients and stir well. Pour into a non-metal bowl or jar. (This starter will poof and grow so provide for plenty of room for fluffery.) Cover with cheesecloth and leave on the counter for 5-10 days. Stir 2 or 3 times a day.

That's the basic recipe I found on the website and there are further instructions in The Post itself. I will be posting about the next step in 5 or 10 days so stay tuned! Will you join with me in the Sourdough Challenge? Pretty pretty please? :) Leave me a comment telling me if you are being darlings and doing this Sourdough Challenge with me! :)

Saturday, February 11, 2012

Coffeelicious! ;)

 One thing you may or may not know about me is that I love coffee! :D Last week I was looking around the web for new ideas and recipes to use coffee in and found this one. I made it one night for the whole family, and I believe it was a big success. :) I mean, seriously. Coffee, chocolate, cherries, and whipped cream all rolled into one steaming mug?! How much better can it get? ;) So, without further ado, here's the recipe:

Deutschland Black Forest

Ingredients:

  • 6 oz hot coffee
  • 2 tbs chocolate syrup
  • 1 tbs maraschino cherry juice
  • Whipped cream
  • Chocolate shavings
  • Maraschino cherries

Preparation:

In a mug, mix coffee, syrup and cherry juice. Stir well then top with whipped cream, chocolate shavings and cherries. Yep, it'll make you want to start speaking German and give you the urge to visit the German Alps! Serves 1 person, double or triple the recipe for more people.


 I hope you all have a blessed weekend! :)
-Sarah

Friday, June 4, 2010

The First of The Zucchini

Zucchini is a desperately misunderstood vegetable. ;) It exists in most peoples' minds as something their parents made them eat. Katie Wilson and I remember it as something our mother's threw on the grill on the way down to Clayton, GA, and that we ate with plugged noses. (For shame! :) I like it now. But did you know that some people don't even realize it is a vegetable? Abigail insists that the reason we don't like going down to the beach in the summer is because there are lots of immodest ladies walking around in zucchinis. Poor vegetable, it has such a false reputation amongst modest little girls who unbeknowst to themselves, daily tend it in the garden! :D All this to say, I have found two recipes in which even the most picky of eaters would fail to detect the presence of zucchini. The first is something Benjamin begs me to make each year. So yesterday, with the first zucchini from our garden, I made it: May I introduce you to:
Chocolate Zucchini Cake!


2 1/2 c. flour 2 c. sugar
1/2 c. cocoa 3 eggs
2 1/2 tsp. baking powder 2 tsp. vanilla
1 1/2 tsp. baking soda 2 tsp. orange zest
1 tsp. salt 2 cups shredded zucchini
1 tsp. cinnamon 1/2 c. milk
3/4 c. softened butter 1 c. nuts (optional)

Combine dry ingredients. Beat butter and sugar until smooth. Add eggs one at a time. Add vanilla, zest, and zucchini. Alternately add dry mixture and milk. Add nuts. Spoon into greased and floured Bundt pan. Bake at 350 degrees F. for 45 minutes. Frost with Chocolate frosting (recipe follows)


Chocolate Frosting

1/2 c. softened butter
2/3 c. cocoa
vanilla to taste
3 c. powdered sugar
1/3 c. milk

Cream butter and cocoa. Add vanilla. Add milk and sugar, alternating. Beat till smooth.


Sound good? We ate ours with fresh strawberries. Here is a picture. (Isn't that hand most mysterious? I wonder who it belongs to? ;)

And the other, equally great recipe that I don't have a picture of:
Zucchini Spice Bread
2 eggs, beaten
1 1/3 c. sugar
2 tsp. vanilla
3 cups grated zucchini
2/3 cups melted butter
2 tsp. baking soda
1 pinch of salt
2 tsp. cinnamon
1/2 tsp. nutmeg
1/2 tsp. ginger
1 cup raisins or nuts (optional)

Mix the eggs, sugar, and vanilla together. Add zucchini and butter. Sprinkle the soda and salt over the mixture, and stir well. Add flour, one cup at a time. Add spices, raisins, and nuts. Bake in 2 greased loaf pans at 350 degrees F. for 50 minutes.

Enjoy the recipes! They were super good! We ate the cake last night, and the bread for breakfast this morning! :P -Rachel

Thursday, May 27, 2010

The Tale Of The Turnip (that sounds scary)

I was sent on a mission today: figure out how to make something with turnips. Something that actually tastes good. Something that we can type out on recipe cards and hand to customers who buy them at the Wilson's on Saturday. They have very generously allowed us to sell our loose-leaf lettuce, turnips, and spinach at their farm pick-up day on Sat. So what is a girl to do who only has a vague idea of what a turnip is used for? I recollected (somewhere in the files of my brain) that you cooked the leafy tops and ate them like regular greens. So far so good. But everyone knows that. The only other inkling I had was that in some AmericanGirl book, the heroine refused to eat her "orange mashed turnips". I am wondering why her's were orange: ours are purple on the outside and white inside! :) So I did a Google search, and I came up with some interesting facts: you can use turnips in any recipe in which potatoes are called for, you can use it instead of cabbage in coleslaw, and it has cancer-fighting nutriets! Yay for that strange vegetable! So I set out to make two recipes, for better or for worse....."Turnip Oven-Fries", and "Mashed Turnips". Sound good? Here's what I did:

Washed, peeled, and cut up the turnips: some I chunked, (to boil) the others I sliced thinly like potatoes. I tossed the thin ones in olive oil, and laid them out on a tray. The others went into a pot of boiling water. Here's a picture of the chunked ones:


The oven-turnips baked at 425 F. for 20 minutes or so, and the stove ones just got the dickens boiled out of them. I like to boil my potatoes to mash until they are nearly falling apart, so I did the turnips the same way.
Back to the oven-turnips: When they were done, I salted them, and had everyone try the finished product: it tasted sort of like sweet potato fry, if you have ever had those. Sort of sweet and mild at the same time. Here is a picture!


Here they are. Aunt Christy added the spinach to the side in lieu of curly kale. :)

Then for the mashed turnips---I strained the water away from them, smushed them up with a pastry-cutter, (I did NOT feel like taking out our whole Bosch thing and doing it the right way! :) and added salt, pepper, butter, and our goat-milk. Yum! They tasted pretty good, if not exactly like real mashed potatoes. I found that they were a bit more wet than potatoes, and a tad bit stringy-ish and lumpy. But that could have been because I didn't use a mixer! Here are a couple pictures of those! :)


Here is a far-away-ish picture. I am dealing once again with our addle-pated camera, so bear with me. We'll call the darkness of the picture "Art" and leave it at that!


And once again, my hand stars in the post. I believe that is all ya'll have seen of me! :) hee-hee. Well, hope this turnip-y post is not too dull! If I were anything like Winnie-the-Pooh, I would have made up a "hum" by now, because "turnip' is a promising sort of word that deserves a rhyme or something! ;) -Rachel